
Welcome to Training Manual #2 - Facebook Basics for Businesses and Groups. If this Manual whets your appetite for some bespoke one-to-one training we can arrange this for only £20 per hour. Details are at the end of the Manual. If you'd like to connect to anything else we do then here are some suggestions;
I
The key topics to be discussed in this Manual are as follows;
- Knowing your way around your Page
- Settings
- Using your Page - Status Updates
- Interacting with Other Pages
- Creating Structure Using Photo Albums
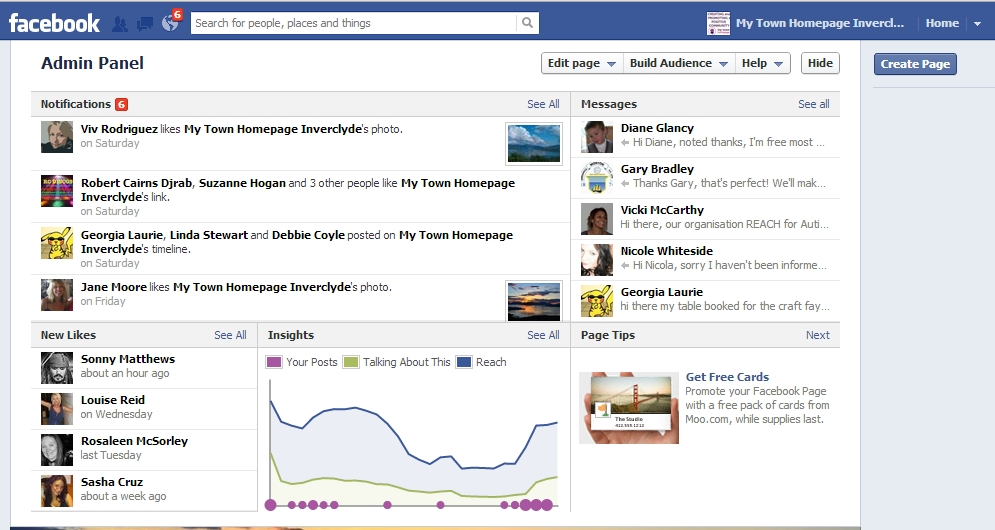
1. Admin Panel
The Admin Panel (at the top of your Page) is the main area that you go to to control and administer your Business Page. There are 5 main parts of the Admin Panel, namely
- Notifications
- Messages
- New Likes
- Insights
- Navigation Bar
1.1 Notifications
Notifications give details of how other people and Pages have recently interacted with your Page. It gives information on;
- Comments - it tells you who has commented on your posts
- Likes - It tells you who has liked any of your posts
- Shares - It tells you who has shared any of your posts of photos.
Within the Notifications section you can see details of all your recent activity (click “See all” in the Notification Panel) and within this Page you can see details of all the notification settings open to you (click “notification settings” at the top of the page). This allows you to set how you get notified for all activity on your Page.
1.2 Messages
Businesses and groups can now choose to receive messages in the same way that individuals can send messages on Facebook. Business and Group Pages still can’t initiate conversations on Facebook but once a person or Page has messaged you, you are free to enter into a discussion with that person. We’ll show you how to switch messages on and off later in this Manual.
Again, to see full info on your messages, click “see all” in the Message Panel and from the Page that loads you can see all your recent messages and search for people or content.
1.3 New Likes
The New Likes section of the Admin Panel shows you details of the people and Pages which have “Liked” your Page. By clicking “see all” you can see separate lists of these people and Pages.
1.4 Insights
Insights gives you statistics on the activity that has taken place on your Page. There are 3 main measures namely;
- Reach - The number of people who have seen content from your Page.
- Talking About This - The number of people who actively engage with your Page by “liking”, “commenting” or “sharing” items of your content
- Your Posts - The number of posts you put on your Page on a certain day.
By clicking “See All” you can get a lot more information about how you are using your Page. This will be dealt with in Session 3 on Facebook Advanced.
1.5 Navigation Bar
The Navigation Bar at the top of the Admin Panel allows you to reach other parts of your Page as follows;
- Edit Page - allows you to update your setttings. More info will be given on this under “Settings” later in the Manual.
- Build Audience - allows you to “Share” your Page with your people and Pages that you use or to send a link to specific email contacts. It also allows you to send an invitation to “Like” your Page to all your Facebook Friends.
- Help - lets you visit the Facebook Help Pages
- Hide - lets you minimise your Admin Panel. Once you do this, the button changes to “Show”. Clicking “Show” will lwt your Admin Panel re-appear.
2 Cover Photo, Profile Photo, About Us and Apps
2.1 Cover Photo
The Cover Photo is the main marketing image that you can use and is also the first image that people see when visiting your Page. It’s therefore important. Your Cover Photo should quickly represent what your company or group is or does. Facebook have a few rules regarding the Cover Photo.
- You're now allowed to have "Calls to Action" which means you can direct people to your website or ask them to "LIKE" or "Share" your Page.
- The amount of words on your Photo shouldn't be more than 20% of the area of your Photo.

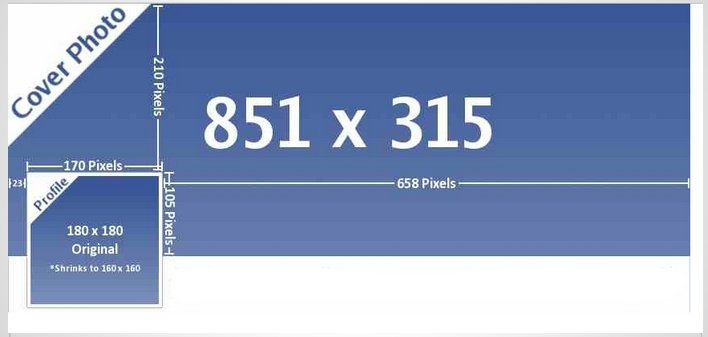
2.2 Profile Photo
The Profile Photo is the small square image at the bottom left corner of your Cover Photo. This is shown anytime you add something to your Page or comment on other Pages. Again, it’s therefore important for you to get a good image that makes your brand easily recognisable. The dimensions of the Cover and Profile Photos are as follows.
2.3 About Us Section
The box lets you put useful basic information about your company or group such as a description; basic info and contact. You can also add more creative information like milestones (creation date; key events etc). It’s important that you fill this box in because it’ll be one of the most easily viewed areas on your Page.
2.4 App Buttons
Underneath your Cover Photo you have space to see up to 4 small thumbnail size photographs. These are your App Buttons and you can use them to link to some useful areas of your Facebook Page or your can add your own bespoke buttons to link to other Apps or Websites.
The first App Button is always your “Photos” Button. Clicking on this will take the user to your Photos and Albums.
The other 3 Buttons can be chosen from the list of Apps you already have e.g. Notes (Links to any Notes you’ve created), Likes (links to a page which gives you details of some of the people who have liked your Page), Videos and Events.
You can change the order the App Buttons are shown by clicking the small pencil in the top right corner of one of the App Buttons and you can add bespoke Buttons (Session 3 will cover this). You can also have up to 12 active buttons.
3 Status Updates, Recent Posts and Likes
Underneath your Cover Photo, the first part of your Page has 3 sections called Status Updates, Recent Posts and Likes.

3.1 Status Updates
Status Updates is the place where you add information to your Page. Here’s a list of some things you can do with a Status Update;
- Add words - up to 63,206 characters in fact but we recommend that you keep your updates short and sweet
- Add photos
- Add links to a photo or note on your Facebook Page or a link to a previous status update or a link to an external website
- Schedule your Update so that it gets added to your page anytime in the future.
- Highlight where you are so that reference to your Update is shown when people look at that place on Facebook. For example if you say your update took place in Greenock, then, if anyone looks at the Greenock Page on Facebook, they’ll see your update.
- Highlight other Pages and People in your Update so that they get notified that you mentioned them
- Add Videos
- Add an Offer (Facebook charge for this)
- Add an Event
- Add a Milestone in your company’s life. Even one that took place in the past.
- Add a question or opinion poll
- Promote your Update so that it reaches more people (Facebook charge for this).
3.2 The “Recent Posts” Box
If you allow people to put posts on your Page (you can adjust this in your settings) then you’ll be able to see a section on your Page called “Recent Posts”. This is a snapshot of the most recent posts that others have put on your Page. Click “more” to see more or click on the “posts by others tab under your Cover Photo to see a full page of posts by others.
3.3 The “Likes” Box
You’ll also be able to see a “Likes” Box where up to 5 of your favourite Pages are highlighted. You can choose which 5 to highlight in your settings (more info below). A good idea is to work with 5 of your colleagues who also want to promote their Page and share links to each others Pages in this Box. It’s a good way to get some regular free publicity for your Page.
4 The “Home” View
4.1 The “Home” View
If you click “Home” at the top right corner of your Page you’ll be taken to the “Home” view. This is a newsfeed of all the Pages that you follow with your own Page. It’s the same concept as the “Home” view in your Personal Profile when you can see the latest updates from all your Friends.
Note that it’s Facebook that decides what you see in the Home Newsfeed. It can be the most recent or popular posts but it can also be a post that Facebook decides to give a high priority to. Status Updates from your own Business Page will appear in other Pages’ Home Newsfeeds assuming Facebook prioritises it appropriately. To stand a good chance of your Posts being seen by others you need to encourage engagement in your Updates i.e. get people to Like, Share, Comment on your Updates.
5 Settings
Settings are important for you to understand your way around. You may not use or have to understand all of your settings but we’ll show you the key ones for you to get acquainted with
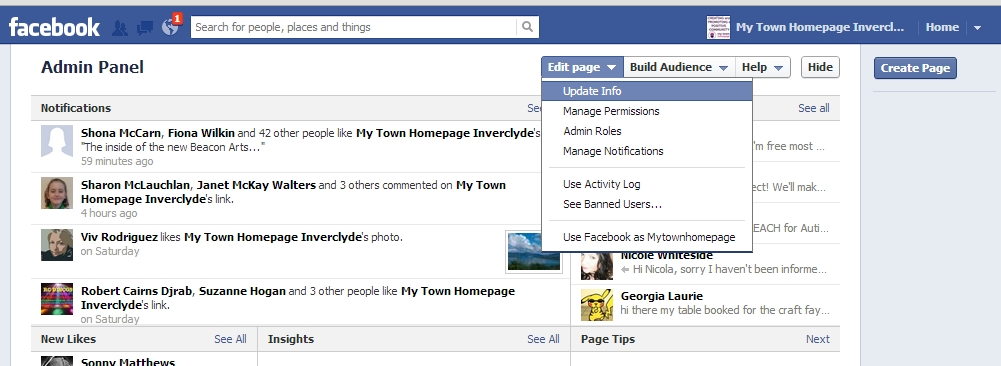
To reach your settings, click on “Edit Page” in the Navigation Bar in your Admin Panel. Then click on the first item shown i.e. “Update Info”. This takes you to the basic information you have for your Page. There’s also a list of all the settings on the left hand side of the Page. We’ll take you through the key settings in turn.
5.1 “Basic Information”
You can’t go wrong here. Just fill in as much as you can in all the relevant boxes on this page. On this settings page you can change the category of your Business or Group if you didn’t set it up properly when you initially set up your Page.
It’s important that once you have over 30 people “Liking” your Page that you choose a username for your Page. This will allow you to have an easily understandable web address for your Page instead of a random long number.
Finally, if you ever feel the need to change the name of your Page's name you can use the settings on this Page to contact Facebook and request a change.
5.2 “Your Settings”
This Settings Page allows you to set the frequency that you get notifications whenever people do anything on your Page. In the early stages of your Page’s life you may want to be notified any time someone interacts in any way with your Page. Whereas, once you get a lot of followers, you may not want to receive email notifications every tome someone does something on your Page.
5.3 “Manage Permissions”
Some of the things this setting pages allows you to do includes;
- Unpublish your Page for a while until you’ve got it looking just the way you want it to look.
- Set restrictions on the nationality and ages of people who can see your Page
- Decide whether people will be allowed to post Updates on your Page or not. If you don’t allow this, people will still be able to see and comment on any Status Update that you put on your Page.
- Decide whether you’d like people to be able to send you messages.
- “Privacy Gating” allows you to decide which type of audience sees any Status Update you make. For example you can target your Status Update to
- Men/Women
- Age ranges
- Relationship Status - Married/Single etc
- Educational Status - School/College/Uni
- Location
- Language
5.4 “Profile Picture”
Lets you change your Profile Picture
5.5 “Featured”
Lets you change your favourite 5 Pages that will show on your “Likes Box” on your Page
5.6 Others
The other settings will be covered in Session 3 “Facebook Advanced”
6 Interacting with Others
It is important that you add regular and interesting Status Updates so that people can get the chance to interact with your Page. By the same token, it is important for your Page to interact with other Pages too. This is the way that your Page gets “seen” by others and will increase the chance of people “Liking” your Page. Some ways for you to interact with others include;
- Using your Page as a Profile you can “Share” Status Updates with other Pages, with your Friends and with any Groups that you are a member of.
- Visit other Pages and “like”, “comment” or “share” their content
- Enter into discussions on Status Updates on your own Page and on other people’s Pages.
- “Like” Pages which are relevant to your Page.
- “Like” Pages who have people that you’d like to follow your own Business Page and “be seen” on those Pages.
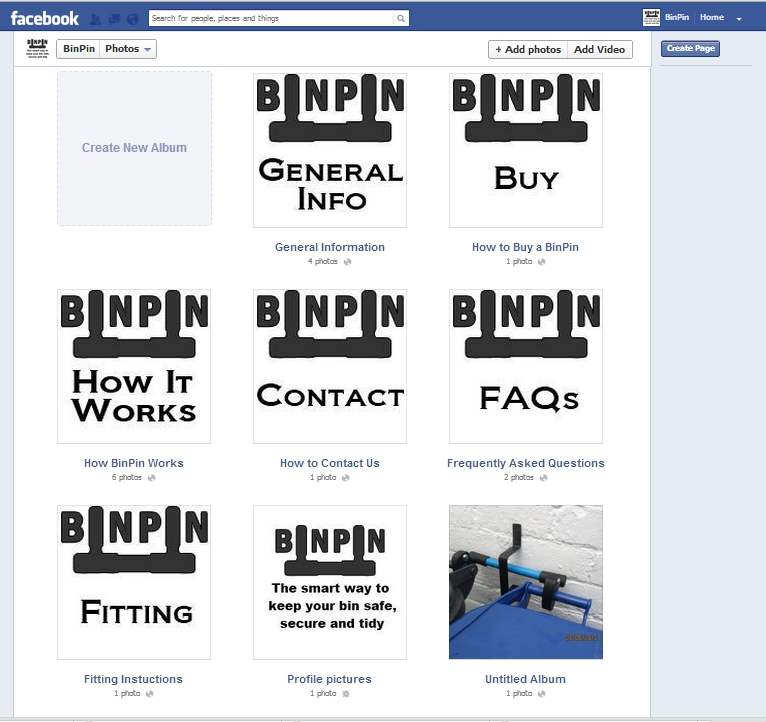
7 Creating Structure with Albums
Photos are one of the best ways to create structure and depth to your Facebook Page. With Albums you can add creative sections to make your Facebook Page look and act like an expensive website.
7.1 Adding Photos to your Page
The easiest way to add a photo to your Page is by using your “Status Update”. Adding a photo in this way adds your photo to a section called “Photos”. You won’t be able to organise the photos you’ve added this way but you’ll be able to see a chronological list of them. To see all the photos that you have added in this way click on the “Photos” Button under your Cover Photo.
7.2 Creating an Album
If you’d like to organise your photos in a more constructive way, set up an Album for them. To set up an Album...
- Click on the “Photos” Button
- Click on “Add Photos”
- Follow the instructions and Name your Album
7.3 Adding Photos to an Album
Once you’ve created an Album you can add photos to it at any time. To do this...
- Click on the “photos” Button
- Click on “Albums” at the top of the Page - this will then show you a grid of all the Albums you have
- Click on the name of the Album you’d like to add photos to
- Click on “Add Photos”
- Follow the instructions
7.4 Changing the Order of Photos in an Album
Once you have created an Album and have added photos to it, you can change the order that people see the photos and change what the Title photo is for that Album...
- Click on the “Photos” Button
- Click on “Albums” at the top of the Page - this will then show you a grid of all the Albums you have
- Click on the name of the Album you’d like to edit
- Click Edit
- To change the order of a photo, left-click the photo and hold. Then drag the photo to the position of your choice
- To choose a Title Photo, click the arrow in the top right corner of the photo you’d like to be the Title Photo. Choose “Make Album Cover”
- To delete an Album click the “Bin” Icon at the top of the Page.
7.5 Linking to a Specific Photo or Album
To link people to a specific photo in your Albums...
- Click on the “Photos” Button
- Click on “Albums” at the top of the Page - this will then show you a grid of all the Albums you have
- Click on the Album Name that holds your Photo.
- Click on the Photo that you’d like to link to.
- Copy the address in your Browser i.e. the long name at the top of the Page e.g. https://www.facebook.com/photo.php?fbid=1015160etc
- Go to your Business Page and click on “Status Update”
- Write a Status Update and then Paste your photo’s address at the end of your Update
- Facebook then create’s a link to your photo
- Once the link has been creating you can delete the long photo address.
- Click “Post”
To link people to an Album, do the same as the above but copy the link to your Album rather than that of a specific Photo.
8 Conclusion and next Training Manual
8.1 The above information sets out the basic information you need to know to use Facebook effectively for your Business or Group. Manual 3 will look at more advanced techniques. Manual 4 will look at Twitter.
If you would like any further information on anything discussed in this Session please contact Willie Wilson of My Town Homepage on the details below.
If you would like any further information on anything discussed in this Information Manual please contact Willie Wilson on the details below.
My Town Homepage also offers bespoke targeted Social Media Training to meet your company’s needs whatever your level of expertise. We offer both 1-to-1 training and Group sessions and both are highly affordable starting from only £20 inc vat per hour.
Willie Wilson
Managing Director
My Town Homepage
admin@mytownhomepage.co.uk
07932 644455
Website - http://www.mytownhomepage.co.uk
Facebook - https://www.facebook.com/mthsocialmedia
Facebook - https://www.facebook.com/mytownhomepageinverclyde
Linkedin - http://uk.linkedin.com/in/williewilson1
No comments:
Post a Comment